Extended Access Lists
“Beware of the extended access list!” This grave warning comes from many CCNA testers who have gone before you. Out of all the topics on the CCNA exam, not one has come close to tripping up candidates more than the extended access list. With most things in Cisco, the difficulty comes in the concept and the syntax is quite simple. However, when it comes to the extended access lists, the concepts are fairly straightforward; it is the syntax that can be a monster. Fear not, my brave CCNA studier. After working through this section, you will feel quite comfortable with extended access lists.
Configuration of Extended Access Lists
After you have set up a few standard access lists, you’ll have the configuration mastered. Standard access lists allow you to permit or deny network traffic based only on the source address. On the other hand, extended access lists allow you to permit or deny traffic based on the sub-protocol, source address, source port number, destination address, and destination port number—and that’s just what is on the CCNA exam. An extended access list can even filter based on time of day or user authentication.
Now if you imagine fitting all those parameters into a single line of syntax, you begin to understand why extended access list syntax can become quite long. Before we get deep into each step of the syntax, let’s take a step back and look at extended
access list parameters from a distance. First off, extended access lists are identified by the numbers 100–199, as shown by context-sensitive help:
Neo(config)#access-list ?
<1-99> IP standard access list
<100-199> IP extended access list
<1100-1199> Extended 48-bit MAC address access list
<1300-1999> IP standard access list (expanded range)
<200-299> Protocol type-code access list
<2000-2699> IP extended access list (expanded range)
<700-799> 48-bit MAC address access list
dynamic-extended Extend the dynamic ACL absolute timer From a broad view, an extended access list requires three major parameters: a protocol, source information, and destination information. The general syntax looks like this:
Access-list <100-199> <protocol> <source_information>
<destination_information>
Now let’s walk through the creation of an extended access list, one piece at a time. This example uses access list 150, putting it smack in the middle of the access list range. For this example, web access should be allowed for one host, 10.1.1.5.
Neo(config)#access-list 150 ?
deny Specify packets to reject dynamic Specify a DYNAMIC list of PERMITs or DENYs permit Specify packets to forward
remark Access list entry comment
The first thing you notice is that you have the standard <permit/deny> option, but now a dynamic option has been added to the list. Although dynamic access lists are beyond the scope of the CCNA certification, the concept is pretty amazing: You can have an access list that allows minimal outbound or inbound access. If you have a user that needs access to a network through your
router, you can authenticate that user to the router with a pre-determined username and password.
If the authentication is successful, a dynamic entry is added to the access list allowing the device access for a certain amount of time, after which the access list entry is removed. Amazing stuff! Because extended access lists have the same implicit deny statement as standard access lists, you must permit at least one type of packet or all traffic is denied. You can now continue on
through this configuration of permitting web access for the host 10.1.1.5, using context-sensitive help to guide you through each additional piece of syntax.
Neo(config)#access-list 150 permit ?
<0-255> An IP protocol number
ahp Authentication Header Protocol
eigrp Cisco’s EIGRP routing protocol
esp Encapsulation Security Payload
gre Cisco’s GRE tunneling
icmp Internet Control Message Protocol
igmp Internet Gateway Message Protocol
ip Any Internet Protocol
ipinip IP in IP tunneling
nos KA9Q NOS compatible IP over IP tunneling
ospf OSPF routing protocol
pcp Payload Compression Protocol
pim Protocol Independent Multicast
tcp Transmission Control Protocol
udp User Datagram Protocol
Now the syntax is starting to look quite a bit different from the standard access list. You now have the choice of what protocol to permit or deny.
EXAM ALERT
Although the list is quite exhaustive, for the CCNA exam you need to be concerned with only the following four protocols: IP, TCP, UDP, and ICMP.
These protocols are roughly defined as the following (the applications are explained further during the discussion on port numbers):
- IP—Permits or denies source/destination addresses that use the entire TCP/IP protocol suite. Using this keyword permits or denies all access from a source to a destination.
- TCP—Permits or denies source/destination addresses that use TCP-based applications. The most common applications include FTP, Telnet, SMTP, and HTTP.
- UDP—Permits or denies source/destination addresses that use UDP-based applications. The most common applications include DNS and TFTP.
- ICMP—Permits or denies source/destination addresses that use ICMP-based applications. The most common applications include Echo, Echo-Reply, and Unreachables.
In this example, the access list needs to permit HTTP access, which uses the TCP protocol.
Neo(config)#access-list 150 permit tcp ?
A.B.C.D Source address
any Any source host
host A single source host
You are now prompted for the source IP address information. Just as with a standard access list, you have the option of entering a source IP address followed by a wildcard mask, using the host keyword to designate an individual host, or using the any keyword to designate all hosts.
This example uses the host keyword to designate an individual PC.
Neo(config)#access-list 150 permit tcp host 10.1.1.5 ?
A.B.C.D Destination address
any Any destination host
eq Match only packets on a given port number
gt Match only packets with a greater port number
host A single destination host
lt Match only packets with a lower port number
neq Match only packets not on a given port number
range Match only packets in the range of port numbers
From this next context-sensitive help prompt, it looks as if there is a prompt to enter either a destination IP address or port information. BEWARE! This is where most extended access list mistakes are made! As you can see from the context-sensitive help, you can enter many forms of port information: a port equal (eq) to a certain number, greater than (gt) a certain number,
less than (lt) a certain port number, a range of port numbers, and the list goes on and on.
Initially, you might think that this is the place to permit the port for HTTP access (port 80). Unfortunately, that thought process is incorrect. This area is where you discover the strange and fascinating phenomena known as a source port number.
By this point, you most likely know the commonly used port numbers such as TCP port 21 for FTP, TCP port 80 for HTTP, and so on. However, most administrators never learn that these are actually destination port numbers. For any TCP/IP-based communication, there is always a destination and source port number. Here’s how it works: imagine you have a PC connected directly to the Internet. You would like to use a web browser to access the latest news headlines; however, like most technology-based individuals, you also have 10 other web browser instances minimized at the bottom of your task bar.
You open a new web browser (instance #11) and access the news website. Sure enough, the web browser window fills with text and pictures of all the latest news and events. Now how in the world did your computer know to fill that web browser window (#11) with the information rather than one of the other 10 you had minimized at the bottom of the screen? The answer is in the source port information. As soon as you opened the web browser #11, Windows (or whatever operating system you are
using) generated a unique source port number for that window. Whenever it attempts to communicate with the destination host, it uses its unique source port number. The source port number that the operating system chooses is always above the range of “well known” ports (which range from 0–1023).
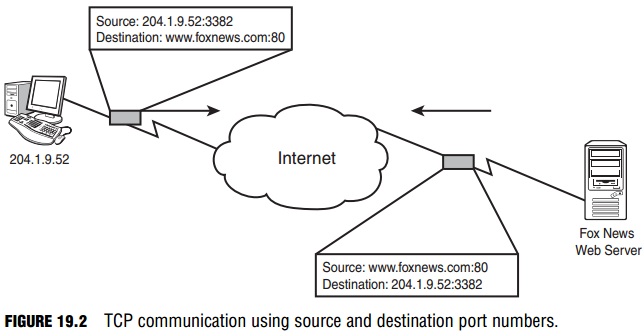
For example, imagine that the news website you want to communicate with is Fox News (www.foxnews.com), and your PC’s IP address is 204.1.9.52. When the web browser opens, it generates a random source port of 3382. As shown in Figure 19.2, when the web request is sent from your PC to the Fox News web server, it is sent to the destination www.foxnews.com:80 (this is known as a socket—the combination of a destination IP address with a destination port number).
It has a source of 204.1.9.52:3382. When the Fox News website communicates back to your PC, it uses a destination of 204.1.9.52:3382 with a source address of www.foxnews.com:80. Back to the task at hand. If you enter port number information after the source IP address, you permit or deny source port information.
NOTE
You will rarely, if ever, know a network device’s source port number information. This number is randomly generated by the host’s operating system.
By omitting the any source port information and continuing on to the destination address specifications, the Cisco router assumes all source ports are permitted. This example allows web access. The destination address is the entire Internet address space. This can be easily summed up with the destination address keyword of any. The following code enters the any keyword and continues to use the context-sensitive help to guide you through each additional piece of syntax.
Neo(config)#access-list 150 permit tcp host 10.1.1.5 any ?
ack Match on the ACK bit
dscp Match packets with given dscp value
eq Match only packets on a given port number
established Match established connections
fin Match on the FIN bit
fragments Check non-initial fragments
gt Match only packets with a greater port number
log Log matches against this entry
log-input Log matches against this entry, including input interface
lt Match only packets with a lower port number
neq Match only packets not on a given port number
precedence Match packets with given precedence value
psh Match on the PSH bit
range Match only packets in the range of port numbers
rst Match on the RST bit
syn Match on the SYN bit
time-range Specify a time-range
tos Match packets with given TOS value
urg Match on the URG bit
<cr>
Now you can see that you have a multitude of choices, some of which include the same port number options you were given before. Now that the destination IP address information has been specified (with the any keyword), you can now fill in the destination port number. Most of the time you will use the eq (equals to) port number syntax to designate a single port
number. The following code enters the eq keyword and continues to use the context-sensitive help to guide you through each additional piece of syntax.
Neo(config)#access-list 150 permit tcp host 10.1.1.5 any eq ?
<0-65535> Port number
bgp Border Gateway Protocol (179)
chargen Character generator (19)
cmd Remote commands (rcmd, 514)
daytime Daytime (13)
discard Discard (9)
domain Domain Name Service (53)
echo Echo (7)
exec Exec (rsh, 512)
finger Finger (79)
ftp File Transfer Protocol (21)
ftp-data FTP data connections (20)
<…output omitted for brevity…>
telnet Telnet (23)
time Time (37)
uucp Unix-to-Unix Copy Program (540)
whois Nicname (43)
www World Wide Web (HTTP, 80)
Notice that the context-sensitive help now provides a list of commonly used port numbers. At the top of the list is the option <0-65536>, enabling you to enter any port number you choose. In this example, you can enter either the keyword www or port number 80 and the result will be the same.
EXAM ALERT
Although you can see the list of commonly used port numbers right now, the list may not be available to you in the CCNA exam. At a minimum, you should commit the following list of ports to memory: TCP Ports:
Port 21: FTP
Port 23: Telnet
Port 25: SMTP
Port 53: DNS
Port 80: HTTP
Port 443: HTTPS
UDP Ports:
Port 53: DNS
Port 69: TFTP
To complete the access list, the necessary port information is added:
Neo(config)#access-list 150 permit tcp host 10.1.1.5 any eq 80
As before, for the access list to take effect, it must be applied. The same syntax is used to do this as is used for the standard access list: ip access-group <in/out>. Don’t forget the best way to find the direction you should apply the access list: Imagine yourself as a router. Is the traffic going away from you (leaving one of your interfaces)? Apply the access list outbound. Is the traffic coming into you (received by one of your interfaces)? Apply the access list inbound.
Cisco recommends applying extended access lists closer to the source of the network traffic you are permitting or denying. This is completely opposite to what you do with standard access lists. The reason for the complete turnaround is that extended access lists enable you to specify source and destination requirements, whereas standard access lists allow you to specify only source requirements. With a standard access list, network traffic may have to cross an entire worldwide network just to find out that it has been denied. With extended access lists, you can designate that traffic is denied from a certain destination before that traffic ever leaves its local subnet.
EXAM ALERT
Standard access lists are always applied closest to the destination. Extended access lists are always applied closest to the source.
Practical Extended Access List Examples
Because of their flexibility, extended access lists are, by far, the most commonly used access lists in production networks. This section takes a look at a few real-world requirements and puts extended access lists into action. Figure 19.3 shows the network diagram used for the extended access list examples.
Blocking a Subnet
This example blocks the Network 2 subnet from reaching the intranet server using the FTP protocol. You must first decide what router to work with. Extended access list best practices recommend denying this traffic as close to the source as possible. This means that you need to access the Maggie router. Maggie(config)#access-list ?
<1-99> IP standard access list
<100-199> IP extended access list
<1100-1199> Extended 48-bit MAC address access list
<1300-1999> IP standard access list (expanded range)
<200-299> Protocol type-code access list
<2000-2699> IP extended access list (expanded range)
<700-799> 48-bit MAC address access list
dynamic-extended Extend the dynamic ACL absolute timer

Because these are extended access lists, you must use access list numbers 100–199. This example uses 125.
Maggie(config)#access-list 125 ?
deny Specify packets to reject
dynamic Specify a DYNAMIC list of PERMITs or DENYs
permit Specify packets to forward
remark Access list entry comment
The objective requires you to deny FTP traffic, so you should use the deny keyword:
Maggie(config)#access-list 125 deny ?
<0-255> An IP protocol number
ahp Authentication Header Protocol
eigrp Cisco’s EIGRP routing protocol
esp Encapsulation Security Payload
gre Cisco’s GRE tunneling
icmp Internet Control Message Protocol
igmp Internet Gateway Message Protocol
ip Any Internet Protocol
ipinip IP in IP tunneling
nos KA9Q NOS compatible IP over IP tunneling
ospf OSPF routing protocol
pcp Payload Compression Protocol
pim Protocol Independent Multicast
tcp Transmission Control Protocol
udp User Datagram Protocol
The FTP application protocol runs on top of TCP, so this is the protocol to choose from the list: Maggie(config)#access-list 125 deny tcp ?
A.B.C.D Source address
any Any source host
host A single source host
The access list now requires source IP address information. Because you are blocking Network
2, you should include the whole 172.16.70.0/24 range:
Maggie(config)#access-list 125 deny tcp 172.16.70.0 0.0.0.255 ?
A.B.C.D Destination address
any Any destination host
eq Match only packets on a given port number
gt Match only packets with a greater port number
host A single destination host
lt Match only packets with a lower port number
neq Match only packets not on a given port number
range Match only packets in the range of port numbers
Be careful, now. You can enter either the destination IP address information or port number information. Remember, this first prompt enables you to enter source port information. You will rarely, if ever, enter any source port restrictions. Of course, the CCNA exam constantly tries to trick you with this often confused fact. This example continues right on to the destination IP address information. The intranet server has the address 172.16.50.100.
Maggie(config)#access-list 125 deny tcp 172.16.70.0 0.0.0.255
3host 172.16.50.100 ?
ack Match on the ACK bit
dscp Match packets with given dscp value
eq Match only packets on a given port number
established Match established connections
fin Match on the FIN bit
fragments Check non-initial fragments
gt Match only packets with a greater port number
log Log matches against this entry
log-input Log matches against this entry, including input interface
lt Match only packets with a lower port number
neq Match only packets not on a given port number
precedence Match packets with given precedence value
psh Match on the PSH bit
range Match only packets in the range of port numbers
rst Match on the RST bit
syn Match on the SYN bit
time-range Specify a time-range
tos Match packets with given TOS value
urg Match on the URG bit
<cr>
Now you are given the option again to enter the port configurations. At this point, the router is requesting destination port information, which is what you need to use to block FTP. Before you can specify an individual port, you must first designate the eq (equal to) syntax:
Maggie(config)# access-list 125 deny tcp 172.16.70.0 0.0.0.255
3host 172.16.50.100 eq ?
<0-65535> Port number
bgp Border Gateway Protocol (179)
chargen Character generator (19)
cmd Remote commands (rcmd, 514)
daytime Daytime (13)
discard Discard (9)
domain Domain Name Service (53)
echo Echo (7)
exec Exec (rsh, 512)
finger Finger (79)
ftp File Transfer Protocol (21)
ftp-data FTP data connections (20)
<…output omitted for brevity…>
telnet Telnet (23)
time Time (37)
uucp Unix-to-Unix Copy Program (540)
whois Nicname (43)
www World Wide Web (HTTP, 80)
You are again given a laundry list of port numbers that you can enter. You can enter the exact port number or use the commonly used port names in the list.
Maggie(config)#access-list 125 deny tcp 172.16.70.0 0.0.0.255
3host 172.16.50.100 eq 21
The first line of the access list is now created, but don’t forget that there is still an implicit deny at the end of the list. If you were to apply this list now, it would block the subnet from reaching anything. You must add at least one permit line; in this case, it is a permit any statement.
Maggie(config)#access-list 125 permit ?
<0-255> An IP protocol number
ahp Authentication Header Protocol
eigrp Cisco’s EIGRP routing protocol
esp Encapsulation Security Payload
gre Cisco’s GRE tunneling
icmp Internet Control Message Protocol
igmp Internet Gateway Message Protocol
ip Any Internet Protocol
ipinip IP in IP tunneling
nos KA9Q NOS compatible IP over IP tunneling
ospf OSPF routing protocol
pcp Payload Compression Protocol
pim Protocol Independent Multicast
tcp Transmission Control Protocol
udp User Datagram Protocol
CAUTION
Remember that with extended access lists, the only protocol that encompasses all TCP/IP traffic is the IP protocol. Often, the TCP protocol is mistakenly chosen for the permit any statement, which results in only TCP-based applications working.
As mentioned before, the access list must permit all other traffic through. Thus, you must use the ip protocol selection followed by a source of any and a destination of any. This is accomplished in the following line:
Maggie(config)#access-list 125 permit ip any any
This line allows all TCP/IP traffic from any source to any destination. This is how to create a permit any (which overrules the implicit deny) in an extended access list. The access list is now created, but before it can take effect, it must be applied—in this case, as close to the source as possible. Looking back at Figure 19.3, you can see that the FastEthernet 0/0 interface is as close to the source as you can get (directly connected), so that is the best option.
Maggie(config)#interface fastethernet 0/0
Maggie(config-if)#ip access-group 125 in
Just like that, the first objective is accomplished. All hosts on Network 2 are denied from using FTP to access the intranet server, but permitted to do anything else. Here is the complete configuration, without commentary:
Maggie(config)#access-list 125 deny tcp 172.16.70.0 0.0.0.255
3host 172.16.50.100 eq 21
Maggie(config)#access-list 125 permit ip any any
Maggie(config)#interface fastethernet 0/0
Maggie(config-if)#ip access-group 125 in
Restricting by Protocol
Allow the host on Network 1 to use only HTTP and HTTPS to access the intranet server. Do not restrict any other access to or from the Network 1 subnet.
This example allows the host on Network 1 to use HTTP and HTTPS only to access the intranet server. Do not restrict any other access to or from the Network 1 subnet. Now that you have seen a couple access list examples, you can do this with a little less commentary. The router closest to the source this time is the Homer router.
Homer(config)#access-list 130 permit tcp host 172.16.60.100
3host 172.16.50.100 eq 80

Homer(config)#access-list 130 permit tcp host 172.16.60.100
3host 172.16.50.100 eq 443
Now that you have added the lines to permit the HTTP and HTTPS protocols coming from
the host on Network 1, you need to deny the host from using any other protocol or port to
access the intranet server:
Homer(config)#access-list 130 deny ip host 172.16.60.100 host 172.16.50.100
Did you remember that you should use the ip keyword rather than tcp? That’s an easy mistake to make. Now you must allow all other traffic to continue unhindered:
Homer(config)#access-list 130 permit ip any any
Finally, you must apply as close to the source as possible:
Homer(config)#interface fastethernet 0/0
Homer(config-if)#ip access-group 130 in
Objective, accomplished!
Restricting by Network
Now here’s something new! In this example, your network should block all incoming Internet traffic unless an Internet host is fulfilling a request originating from the internal network. This is one of the most common requests for networks requiring Internet access. Executives want the network to be secure, so they want to block all incoming traffic from the Internet.
However, if you plan on applying a deny ip any any–style access list to the Internet interface, you might as well unplug the cable. This is why Cisco came up with something known as the TCP-established access list command. Here’s the concept:
When a web browser connects to a web server, it typically does so on TCP port 80. To be reliable, the TCP protocol initiates all its sessions using something known as a TCP three-way handshake.
This process gets both the sending and receiving hosts on the same page and begins the data transfer. What the TCP-established command access list argument does is watch for this handshake to take place. It then opens return traffic ports to allow the contacted Internet host (and only that host) to communicate back to the internal machine requesting data. To satisfy the objective, you can access the command prompt on the Marge router and enter
the following line:
Marge(config)#access-list 110 permit tcp any any established
This access list is then applied to the interface connected to the Internet in the incoming direction:
Marge(config)#interface serial 1/0
Marge(config-if)#ip access-group 110 in
CAUTION
Although permitting only the TCP established sessions is very secure, it is not flawless. Cisco therefore created something known as Context Based Access Control (CBAC), implemented in firewall feature-set IOS versions. Although this is not on the exam, it is worth mentioning.
EXAM ALERT
Know how to implement a TCP-established access list and what effect this type of configuration has.
Named Access List
In recent years, Cisco has introduced a much better form of access list. As the name implies, a named access list transcends the typical access list number ranges, enabling you to assign a logical name to the access list. In addition to the logical name, these named access lists also allow some simple editing. You can remove individual access list lines without deleting and re-creating the entire access list. In very recent IOS versions, the named access lists have been enhanced to allow complete flexibility of inserting and even rearranging access list entries. Named access lists are also configured from Global Configuration mode, but are prefaced with the ip command:
Marge(config)#ip access-list ?
extended Extended Access List
log-update Control access list log updates
logging Control access list logging
resequence Resequence Access List
standard Standard Access List
Because you have specified that you would like to create an IP access list (as opposed to IPX
or Appletalk), the router would like to know whether you would like to create a standard or
extended access list (and don’t worry, I talk about that intriguing resequence keyword later).
It’s time to set up a standard access list:
Marge(config)#ip access-list standard ?
<1-99> Standard IP access-list number
<1300-1999> Standard IP access-list number (expanded range)
WORD Access-list name
At first, it doesn’t look too different from the numbered access lists created thus far. However,
look at that last option: Access-list name. You can enter the name of an access list. I’ll name
this one Jeremy’s_List. Watch what happens:
Marge(config)#ip access-list standard Jeremy’s_List
Marge(config-std-nacl)#
Now, instead of adding access list lines directly from Global Configuration mode, you are
taken into an access list sub-configuration mode. From here, you can add permit and deny
entries.
Marge(config-std-nacl)#?
Standard Access List configuration commands:
<1-2147483647> Sequence Number
default Set a command to its defaults
deny Specify packets to reject
exit Exit from access-list configuration mode
no Negate a command or set its defaults
permit Specify packets to forward
remark Access list entry comment
Notice the addition of the sequence number option! By default, the Cisco router inserts lines with sequence number increments of 10. That means that the first line you enter is sequence 10, the next will be 20, and so on. This is fantastic because you can squeeze lines in between just by choosing a sequence number in the range greater than 10 and less than 20. Here is a
brief example of this:
Marge(config-std-nacl)#10 permit host 10.1.1.1
Marge(config-std-nacl)#20 permit host 10.2.2.2
Marge(config-std-nacl)#15 permit host 10.3.3.3
Marge(config-std-nacl)#^Z
Marge#show access-lists
Standard IP access list Jeremy’s_List
20 permit 10.2.2.2
15 permit 10.3.3.3
10 permit 10.1.1.1
Lines can be removed by entering no <sequence number>. This makes the old form of access
list look rudimentary.
Marge (config)#ip access-list standard Jeremy’s_List
Marge (config-std-nacl)#no 15
Marge (config-std-nacl)#^Z
Marge #show access-lists
Standard IP access list Jeremy’s_List
20 permit 10.2.2.2
10 permit 10.1.1.1
Now, check out the command you saw in the context-sensitive help earlier:
Marge(config)#ip access-list resequence Jeremys_List ?
<1-2147483647> Starting Sequence Number
This resequence command makes it possible to move access list lines around! For example, if I wanted to move sequence number 10 to sequence number 35, I could enter
Marge(config)#ip access-list resequence Jeremys_List 10 35
NOTE
The sequence number feature was added to all access lists (named or otherwise) in IOS version 12.2(15)T and 12.3(2)T.