Sometimes replay through VMs does not produce expected results due to disk space and other VM constraints. Replay through a traffic generator such as BreakingPoint does not satisfy the requirement in testing reassembly issues. BreakingPoint fixes the reassembly errors, so the need is for a physical replay server in testing some specific customer issues.
Replay the customer pcap as is on SRX through a physical replay server using LRM.
Replay server: 172.22.196.112
Currently only 172.22.196.112 is available in LRM, 111 is not mapped to LRM yet.
Steps to set up and test TCP replay:
1. Reserve the ports on the replay server and reserve the SRX as needed in LRM by logging in to https://inception.juniper.net/lrm.
2. Make sure the interfaces are added for the resource (SRX and replay server) in LRM. They will appear under Edit Resource > Interfaces tab > name.
3. Make sure the native net planes are installed for the resource under Edit Resource > Interfaces tab > Native Net plane. If either the interfaces or native net planes are missing, open a lab ticket with the lab team to get them added and installed in LRM. The following screen shot is a working example; we can see that the interfaces are listed and that the native net plane is installed.
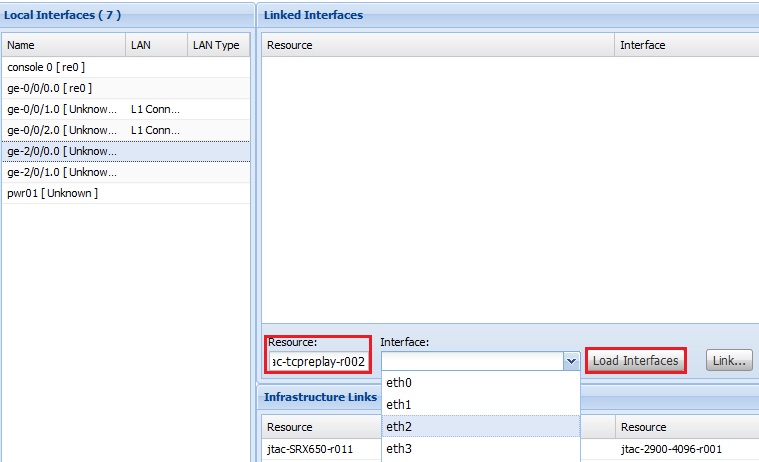
4. Set up L1 connections between them:
a. Select the Links tab.
b. Choose the SRX interface to be connected to the replay server interface.
c. Enter the resource to connect to (such as “tcpreplay server”).
d. Click Load Interfaces to populate the replay server interfaces.
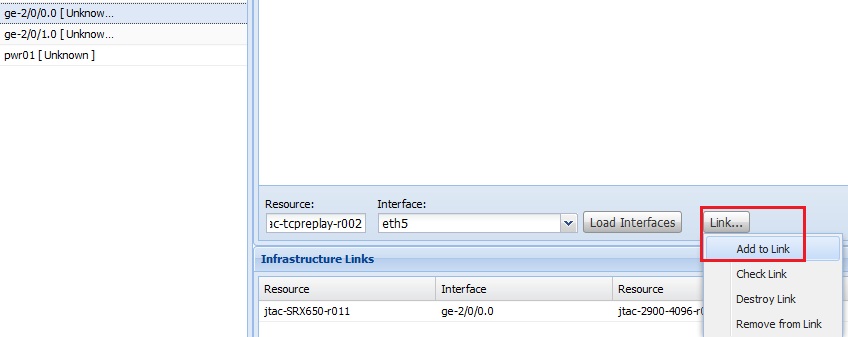
e. Choose the relevant interface. For example, the following screen shows how to link SRX interface ge-2/0/0 to replay server interface eth5.
After choosing the interface, click Link > Add Link to make the L1 connection. Note that before making this connection, interface ge-2/0/0 does not show anything under LAN.
After the connection/link is successful, we can see it under Linked Interfaces. The LAN gets populated with L1 Connection.
5. Verify that the links are up on both the SRX and replay server devices. Sometimes SRX negotiates to half-duplex when L1 connections are made through LRM; in that case, disable autoneg and configure speed /duplex manually on SRX. Then remove and add the links again.
6. Add static routes on replay server sudo nano /etc/network/interfaces. Restart the networking service for the routes to take effect and make sure that the routes are seen on the replay server (use the route command to check). Make sure the interfaces of the replay server and SRX device can ping each other.
7. Set up the User directory on the replay server under /home/juniper/.
8. Run the replay commands (see below) and verify that the sessions are seen on the SRX device and if the issue is seen (if reproducible).
Replay Commands
Note: Log in as “root” to run the replay commands.
Only two commands are needed:
tcpprep --auto=bridge --cachefile=tcpreass.cache --pcap=tcpreass.pcap
tcpreplay-edit -i eth4 -I eth5 --enet-dmac="88:e0:f3:e6:b3:01,88:e0:f3:e6:b3:02" --enet-smac="00:1b:21:bf:1e:10,00:1b:21:bf:1e:11" -e "20.20.20.10:30.30.30.10" -c tcpreass.cache -p 1 tcpreass.pcap
In the above example:
-i = server interface
-I = client interface
--enet-dmac= mac addresses of SRX interfaces
--enet-smac= mac addresses of replay server’s eth4 and eth5
-e= ip addresses of eth4 and eth5 of replay server which rewrites the actual IPs of pcap
-c= cache file
-p = pps rate

-p option needs to be tweaked sometimes to replicate real time pps rate as in customer network. In this example the pps rate of 1 had to be chosen to see customer issue.
Note: For a quick test, the example shows that L1 connections are made with the Add Link feature of LRM. The ideal way is to build a topology so that it can be modified, retrieved, and altered when needed.


